一、環境搭建
1.系統環境
Ubuntu 17.04 Python 2.7.14 pycharm 開發工具2.開發環境,安裝各種系統包
人臉檢測基于dlib,dlib依賴Boost和cmake
在windows中如果要使用dlib還是比較麻煩的,如果想省時間可以在anaconda中安裝
conda install -c conda-forge dlib=19.4
$ sudo apt-get install build-essential cmake $ sudo apt-get install libgtk-3-dev $ sudo apt-get install libboost-all-dev其他重要的包
$ pip install numpy $ pip install scipy $ pip install opencv-python $ pip install dlib安裝 face_recognition
# 安裝 face_recognition $ pip install face_recognition # 安裝face_recognition過程中會自動安裝 numpy、scipy 等二、使用教程
1、facial_features文件夾
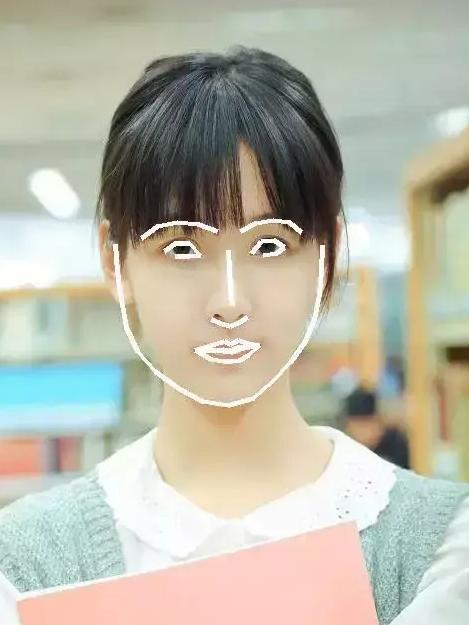
此demo主要展示了識別指定圖片中人臉的特征數據,下面就是人臉的八個特征,我們就是要獲取特征數據
'chin', 'left_eyebrow', 'right_eyebrow', 'nose_bridge', 'nose_tip', 'left_eye', 'right_eye', 'top_lip', 'bottom_lip'運行結果:
自動識別圖片中的人臉,并且識別它的特征
原圖:

特征數據,數據就是運行出來的矩陣,也就是一個二維數組
代碼:
# -*- coding: utf-8 -*- # 自動識別人臉特征 # filename : find_facial_features_in_picture.py # 導入pil模塊 ,可用命令安裝 apt-get install python-Imaging from PIL import Image, ImageDraw # 導入face_recogntion模塊,可用命令安裝 pip install face_recognition import face_recognition # 將jpg文件加載到numpy 數組中 image = face_recognition.load_image_file("chenduling.jpg") #查找圖像中所有面部的所有面部特征 face_landmarks_list = face_recognition.face_landmarks(image) print("I found {} face(s) in this photograph.".format(len(face_landmarks_list))) for face_landmarks in face_landmarks_list: #打印此圖像中每個面部特征的位置 facial_features = [ 'chin', 'left_eyebrow', 'right_eyebrow', 'nose_bridge', 'nose_tip', 'left_eye', 'right_eye', 'top_lip', 'bottom_lip' ] for facial_feature in facial_features: print("The {} in this face has the following points: {}".format(facial_feature, face_landmarks[facial_feature])) #讓我們在圖像中描繪出每個人臉特征! pil_image = Image.fromarray(image) d = ImageDraw.Draw(pil_image) for facial_feature in facial_features: d.line(face_landmarks[facial_feature], width=5) pil_image.show()2、find_face文件夾
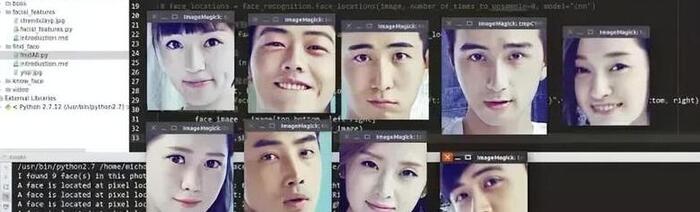
不僅能識別出來所有的人臉,而且可以將其截圖挨個顯示出來,打印在前臺窗口
原始的圖片

識別的圖片
代碼:
# -*- coding: utf-8 -*- # 識別圖片中的所有人臉并顯示出來 # filename : find_faces_in_picture.py # 導入pil模塊 ,可用命令安裝 apt-get install python-Imaging from PIL import Image # 導入face_recogntion模塊,可用命令安裝 pip install face_recognition import face_recognition # 將jpg文件加載到numpy 數組中 image = face_recognition.load_image_file("yiqi.jpg") # 使用默認的給予HOG模型查找圖像中所有人臉 # 這個方法已經相當準確了,但還是不如CNN模型那么準確,因為沒有使用GPU加速 # 另請參見: find_faces_in_picture_cnn.py face_locations = face_recognition.face_locations(image) # 使用CNN模型 # face_locations = face_recognition.face_locations(image, number_of_times_to_upsample=0, model="cnn") # 打印:我從圖片中找到了 多少 張人臉 print("I found {} face(s) in this photograph.".format(len(face_locations))) # 循環找到的所有人臉 for face_location in face_locations: # 打印每張臉的位置信息 top, right, bottom, left = face_location print("A face is located at pixel location Top: {}, Left: {}, Bottom: {}, Right: {}".format(top, left, bottom, right)) # 指定人臉的位置信息,然后顯示人臉圖片 face_image = image[top:bottom, left:right] pil_image = Image.fromarray(face_image) pil_image.show()3、know_face文件夾
通過設定的人臉圖片識別未知圖片中的人臉
# -*- coding: utf-8 -*- # 識別人臉鑒定是哪個人 # 導入face_recogntion模塊,可用命令安裝 pip install face_recognition import face_recognition #將jpg文件加載到numpy數組中 chen_image = face_recognition.load_image_file("chenduling.jpg") #要識別的圖片 unknown_image = face_recognition.load_image_file("sunyizheng.jpg") #獲取每個圖像文件中每個面部的面部編碼 #由于每個圖像中可能有多個面,所以返回一個編碼列表。 #但是由于我知道每個圖像只有一個臉,我只關心每個圖像中的第一個編碼,所以我取索引0。 chen_face_encoding = face_recognition.face_encodings(chen_image)[0] print("chen_face_encoding:{}".format(chen_face_encoding)) unknown_face_encoding = face_recognition.face_encodings(unknown_image)[0] print("unknown_face_encoding :{}".format(unknown_face_encoding)) known_faces = [ chen_face_encoding ] #結果是True/false的數組,未知面孔known_faces陣列中的任何人相匹配的結果 results = face_recognition.compare_faces(known_faces, unknown_face_encoding) print("result :{}".format(results)) print("這個未知面孔是 陳都靈 嗎? {}".format(results[0])) print("這個未知面孔是 我們從未見過的新面孔嗎? {}".format(not True in results))4、video文件夾
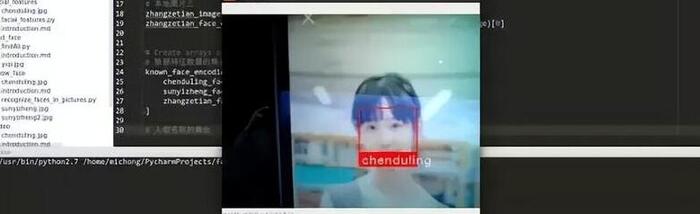
通過調用電腦攝像頭動態獲取視頻內的人臉,將其和我們指定的圖片集進行匹配,可以告知我們視頻內的人臉是否是我們設定好的
實現:
代碼:
# -*- coding: utf-8 -*- # 攝像頭頭像識別 import face_recognition import cv2 video_capture = cv2.VideoCapture(0) # 本地圖像 chenduling_image = face_recognition.load_image_file("chenduling.jpg") chenduling_face_encoding = face_recognition.face_encodings(chenduling_image)[0] # 本地圖像二 sunyizheng_image = face_recognition.load_image_file("sunyizheng.jpg") sunyizheng_face_encoding = face_recognition.face_encodings(sunyizheng_image)[0] # 本地圖片三 zhangzetian_image = face_recognition.load_image_file("zhangzetian.jpg") zhangzetian_face_encoding = face_recognition.face_encodings(zhangzetian_image)[0] # Create arrays of known face encodings and their names # 臉部特征數據的集合 known_face_encodings = [ chenduling_face_encoding, sunyizheng_face_encoding, zhangzetian_face_encoding ] # 人物名稱的集合 known_face_names = [ "michong", "sunyizheng", "chenduling" ] face_locations = [] face_encodings = [] face_names = [] process_this_frame = True while True: # 讀取攝像頭畫面 ret, frame = video_capture.read() # 改變攝像頭圖像的大小,圖像小,所做的計算就少 small_frame = cv2.resize(frame, (0, 0), fx=0.25, fy=0.25) # opencv的圖像是BGR格式的,而我們需要是的RGB格式的,因此需要進行一個轉換。 rgb_small_frame = small_frame[:, :, ::-1] # Only process every other frame of video to save time if process_this_frame: # 根據encoding來判斷是不是同一個人,是就輸出true,不是為flase face_locations = face_recognition.face_locations(rgb_small_frame) face_encodings = face_recognition.face_encodings(rgb_small_frame, face_locations) face_names = [] for face_encoding in face_encodings: # 默認為unknown matches = face_recognition.compare_faces(known_face_encodings, face_encoding) name = "Unknown" # if match[0]: # name = "michong" # If a match was found in known_face_encodings, just use the first one. if True in matches: first_match_index = matches.index(True) name = known_face_names[first_match_index] face_names.append(name) process_this_frame = not process_this_frame # 將捕捉到的人臉顯示出來 for (top, right, bottom, left), name in zip(face_locations, face_names): # Scale back up face locations since the frame we detected in was scaled to 1/4 size top *= 4 right *= 4 bottom *= 4 left *= 4 # 矩形框 cv2.rectangle(frame, (left, top), (right, bottom), (0, 0, 255), 2) #加上標簽 cv2.rectangle(frame, (left, bottom - 35), (right, bottom), (0, 0, 255), cv2.FILLED) font = cv2.FONT_HERSHEY_DUPLEX cv2.putText(frame, name, (left + 6, bottom - 6), font, 1.0, (255, 255, 255), 1) # Display cv2.imshow('monitor', frame) # 按Q退出 if cv2.waitKey(1) & 0xFF == ord('q'): break video_capture.release() cv2.destroyAllWindows()5、boss文件夾
本開源項目,主要是結合攝像頭程序+極光推送,實現識別攝像頭中的人臉。并且通過極光推送平臺給移動端發送消息!
人臉識別全過程解析1、人臉檢測
“人臉檢測(Face Detection)”是檢測出圖像中人臉所在位置的一項技術。
人臉檢測算法的輸入是一張圖片,輸出是人臉框坐標序列(0個人臉框或1個人臉框或多個人臉框)。一般情況下,輸出的人臉坐標框為一個正朝上的正方形,但也有一些人臉檢測技術輸出的是正朝上的矩形,或者是帶旋轉方向的矩形。
常見的人臉檢測算法基本是一個“掃描”加“判別”的過程,即算法在圖像范圍內掃描,再逐個判定候選區域是否是人臉的過程。因此人臉檢測算法的計算速度會跟圖像尺寸、圖像內容相關。開發過程中,我們可以通過設置“輸入圖像尺寸”、或“最小臉尺寸限制”、或“人臉數量上限”的方式來加速算法。

2、人臉配準
“人臉配準(Face Alignment)”是定位出人臉上五官關鍵點坐標的一項技術。
人臉配準算法的輸入是“一張人臉圖片”加“人臉坐標框”,輸出五官關鍵點的坐標序列。五官關鍵點的數量是預先設定好的一個固定數值,可以根據不同的語義來定義(常見的有5點、68點、90點等等)。
當前效果的較好的一些人臉配準技術,基本通過深度學習框架實現,這些方法都是基于人臉檢測的坐標框,按某種事先設定規則將人臉區域扣取出來,縮放的固定尺寸,然后進行關鍵點位置的計算。因此,若不計入圖像縮放過程的耗時,人臉配準算法是可以計算量固定的過程。另外,相對于人臉檢測,或者是后面將提到的人臉提特征過程,人臉配準算法的計算耗時都要少很多。
3、人臉屬性識別
“人臉屬性識別(Face Attribute)”是識別出人臉的性別、年齡、姿態、表情等屬性值的一項技術。
一般的人臉屬性識別算法的輸入是“一張人臉圖”和“人臉五官關鍵點坐標”,輸出是人臉相應的屬性值。人臉屬性識別算法一般會根據人臉五官關鍵點坐標將人臉對齊(旋轉、縮放、扣取等操作后,將人臉調整到預定的大小和形態),然后進行屬性分析。
常規的人臉屬性識別算法識別每一個人臉屬性時都是一個獨立的過程,即人臉屬性識別只是對一類算法的統稱,性別識別、年齡估計、姿態估計、表情識別都是相互獨立的算法。但的一些基于深度學習的人臉屬性識別也具有一個算法同時輸入性別、年齡、姿態等屬性值的能力。
4、以在基本保證算法效果的前提下,將模型大小和運算速度優化到移動端可用的狀態。
5、人臉比對(人臉驗證、人臉識別、人臉檢索、人臉聚類)
“人臉比對(Face Compare)”是衡量兩個人臉之間相似度的算法
人臉比對算法的輸入是兩個人臉特征(注:人臉特征由前面的人臉提特征算法獲得),輸出是兩個特征之間的相似度。人臉驗證、人臉識別、人臉檢索都是在人臉比對的基礎上加一些策略來實現。相對人臉提特征過程,單次的人臉比對耗時極短,幾乎可以忽略。
基于人臉比對可衍生出人臉驗證(Face Verification)、人臉識別(Face Recognition)、人臉檢索(Face Retrieval)、人臉聚類(Face Cluster)等算法。
6、人臉驗證
“人臉驗證(Face Verification)”是判定兩個人臉圖是否為同一人的算法。
它的輸入是兩個人臉特征,通過人臉比對獲得兩個人臉特征的相似度,通過與預設的閾值比較來驗證這兩個人臉特征是否屬于同一人(即相似度大于閾值,為同一人;小于閾值為不同)。
7、 人臉識別
“人臉識別(Face Recognition)”是識別出輸入人臉圖對應身份的算法。
它的輸入一個人臉特征,通過和注冊在庫中N個身份對應的特征進行逐個比對,找出“一個”與輸入特征相似度較高的特征。將這個較高相似度值和預設的閾值相比較,如果大于閾值,則返回該特征對應的身份,否則返回“不在庫中”。
8、人臉檢索
“人臉檢索”是查找和輸入人臉相似的人臉序列的算法。
人臉檢索通過將輸入的人臉和一個集合中的說有人臉進行比對,根據比對后的相似度對集合中的人臉進行排序。根據相似度從高到低排序的人臉序列即使人臉檢索的結果。
9、人臉聚類
“人臉聚類(Face Cluster)”是將一個集合內的人臉根據身份進行分組的算法。
人臉聚類也通過將集合內所有的人臉兩兩之間做人臉比對,再根據這些相似度值進行分析,將屬于同一個身份的人劃分到一個組里。
在沒有進行人工身份標注前,只知道分到一個組的人臉是屬于同一個身份,但不知道確切身份。另外假設集合中有N個人臉,那么人臉聚類的算法復雜度為O(N2)
10、人臉活體
“人臉活體(FaceLiveness)”是判斷人臉圖像是來自真人還是來自攻擊假體(照片、視頻等)的方法。
和前面所提到的人臉技術相比,人臉活體不是一個單純算法,而是一個問題的解法。這個解法將用戶交互和算法緊密結合,不同的交互方式對應于完全不同的算法。鑒于方法的種類過于繁多,這里只介紹“人臉活體”的概念,不再展開。
logo設計網(www.just4love.cn),專業的logo免費設計在線生成網站,全自動智能化logo設計,商標設計,logo在線生成!
歡迎使用logo設計網制作屬于您公司自己的logo,不僅專業而且經濟實惠,全方位滿足您公司品牌化、視覺化的需求。


 [掃碼關注我們]
